Alert on inferences
Triggers can send alerts in the form of email notifications or webhook requests when new data syncs to the cloud.
This guide shows you how to set up an alert system that notifies you when specific objects or classifications are detected in your camera feed. The process involves three resources:
- Filtered Camera: Filters images passed to the data management service
- Data Management: Syncs filtered images to the cloud
- Triggers: Sends alerts when data syncs
For example, a trigger could alert you when a camera feed detects an anomaly.
Prerequisites
Before setting up alerts, you need:
Configure a filtered camera
The filtered-camera module functions as a normal camera unless used with the data management service.
When you configure the data management service to capture and sync images from the camera, the camera will only pass images to the data management service if they meet the defined criteria.
The camera module takes a vision service and applies it to a camera feed using the generated predictions to filter the output for the data management service.
Configure the filtered camera module to capture images when specific predictions occur:
Navigate to your machine’s CONFIGURE tab.
Click the + (Create) button next to your main part in the left-hand menu and select Component or service. Start typing
filtered-cameraand select camera / filtered-camera from the results. Click Add module.Name your filtering camera something like
objectfilter-camand click Create.Paste a configuration into the attributes field:
Replace the
<camera_name>and<vision_service_name>values with the names of your camera and vision service.Choose your detection type:
- For object detection (bounding boxes around objects): Use the
objectsconfiguration with the label you want to alert on and removeclassifications - For classification (image-level labels): Use the
classificationsconfiguration with the label you want to alert on and removeobjects
The confidence threshold (0.0-1.0) determines how certain the vision model must be before capturing photos. For example, a confidence threshold of
0.6only captures photos when the vision model is at least 60% sure that it has correctly identified the desired label.{ "camera": "<camera_name>", "vision_services": [ { "vision": "<vision_service_name>", "classifications": { "<label>": 0.5 }, "objects": { "<label>": 0.5 } } ] }For example, if using the YOLOv8 model (named
yolo) for hard hat detection as demonstrated in the Monitor Helmet Usage tutorial:{ "camera": "my_webcam", "vision_services": [ { "vision": "yolo", "objects": { "NO-Hardhat": 0.6 } } ] }- For object detection (bounding boxes around objects): Use the
Click Save in the top right corner of the screen to save your changes.
For more information, see the filtered-camera module README.
Tip
Viam provides a way to monitor detections, classifications, and confidence levels from a live vision service. To view this information, navigate to the vision service card and expand the TEST panel. You can use this to verify your confidence level configuration.
Configure data capture and sync
The data management service captures data and syncs it to the Viam cloud. This step connects your filtered camera to the cloud so that detected images can trigger alerts.
Configure data capture on the filtered-camera resource to capture images of detections or classifications:
Add the data management service to your machine:
Navigate to your machine’s CONFIGURE tab.
Click the + (Create) button next to your main part in the left-hand menu and select Component or service. Enter “data” and select data management. Name your data management service
data-managerand click Create.Leave all the default data service attributes as they are and click Save in the top right corner of the screen to save your changes.
Enable data capture on your filtered camera: Locate the
objectfilter-campanel.Click Add method. Click the Type dropdown and select GetImages. Set the capture frequency to
0.2images per second (equivalent to one image every 5 seconds). You can adjust the frequency to suit your use case.
Configure a trigger on your machine
Triggers send webhook requests or email notifications when certain events happen:
- Your filtered camera captures an image when it detects the specified objects or classifications
- The data management service syncs that image to the cloud
- A trigger detects the sync event and sends your alert
Since the filtered camera only captures images that meet the specified criteria, it only syncs images when a label is identified. Therefore, if you configure a filtered camera to capture images when an anomaly is detected, an image of the anomaly gets synced, a trigger fires, and an alert is sent.
Follow these steps to configure a trigger to alert when filtered-camera syncs an image:
Go to the CONFIGURE tab of your machine. Click the + (Create) button in the left side menu and select Trigger.
Enter a name and click Create.
In the Type dropdown, select Data has been synced to the cloud.
In the Data Types dropdown, select Binary (image).
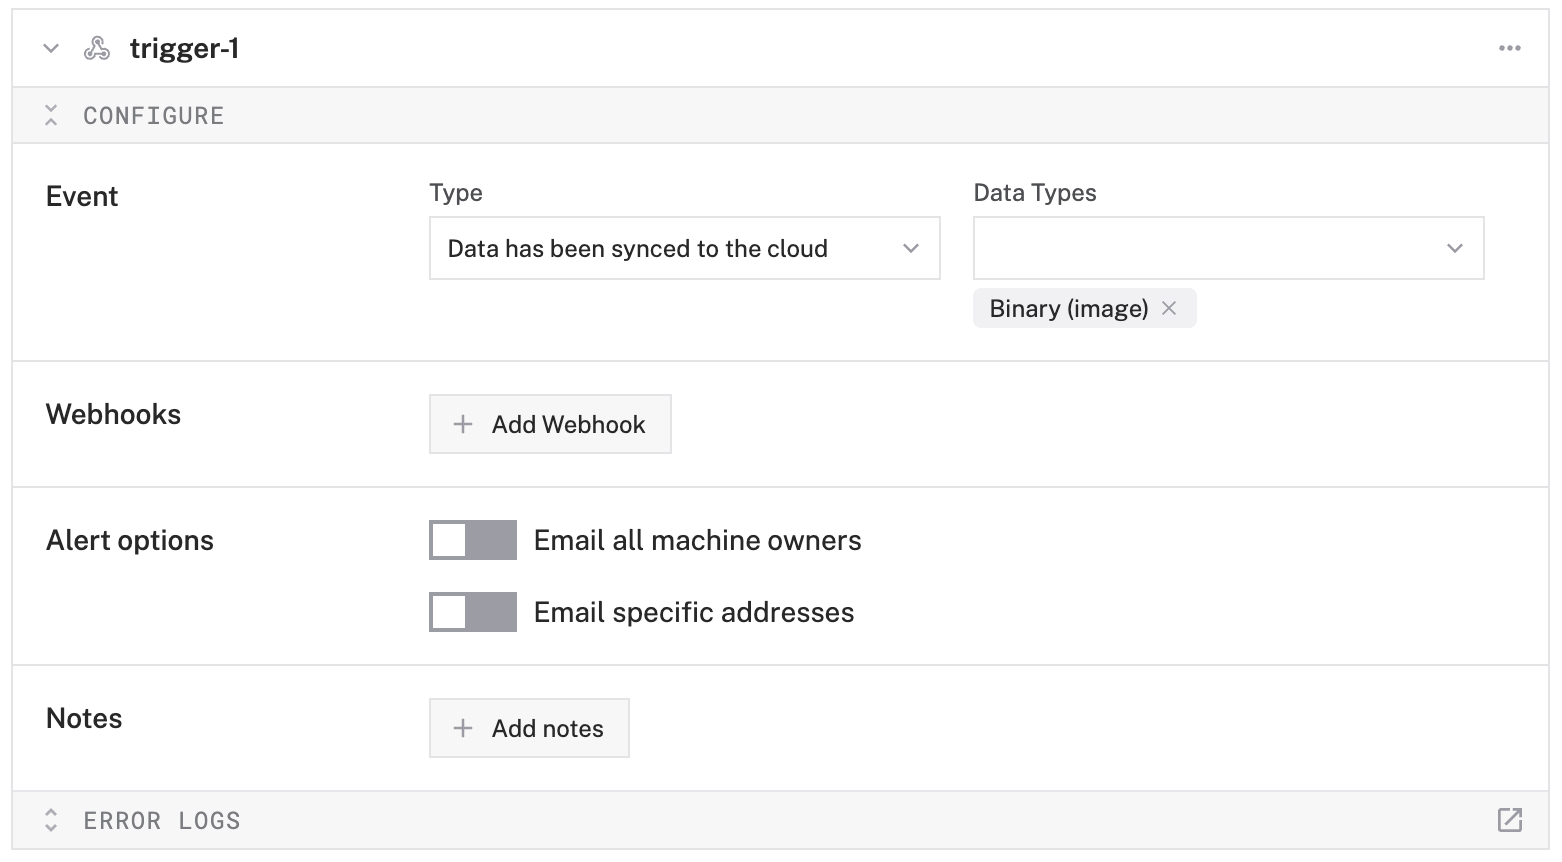
Add notification methods to the Webhooks or Alert options sub-panels:
To add an email notification for specific email addresses:
- Toggle Email specific addresses on and add the email addresses you wish to be notified whenever this trigger fires.
- Set the alert frequency.
To add an email notification for all machine owners:
- Toggle Email all machine owners on.
- Set the alert frequency.
To add a webhook notification:
Click Add Webhook.
Add the URL of your cloud function.
Write your cloud function to process the webhook data. Use your cloud function to process data or interact with external APIs, such as Twilio, PagerDuty, or Zapier.
Configure the notification frequency (for example, maximum one alert per hour).
Click Save in the top right corner of the screen to save your configuration.

Testing
Verify your setup:
- Make sure
viam-serveris running on your machine - Confirm your vision service is working by checking the TEST panel
- Ensure your filtered camera configuration matches your vision service’s output labels
- Make sure
Test the detection:
- Present the camera with an object or situation that should trigger the alert
- Watch the vision service TEST panel to confirm detections are occurring
- Check that the confidence levels meet your threshold
Monitor the data flow:
- The data management service attempts to get an image from the filtered camera based on the configured capture interval
- Once the data management service captures an image, the image will sync when the next sync interval is reached
- At this point you will receive your email or webhook alert
Troubleshooting
No alerts received?
- Check the LOGS tab
- Check that your vision service is detecting objects with sufficient confidence
- Verify your filtered camera configuration matches the vision service output
- Ensure the data management service is capturing images (check the data tab)
- Confirm your trigger configuration is correct
Too many alerts?
If you’re getting too many false positives, increase your confidence threshold in the filtered camera configuration.
If you receive too many alerts and want to limit them to once per hour maximum, adjust the notification frequency in your trigger settings.
Was this page helpful?
Glad to hear it! If you have any other feedback please let us know:
We're sorry about that. To help us improve, please tell us what we can do better:
Thank you!